Showing posts with label food. Show all posts

Saturday, June 2, 2012

Canning


Chrissie and I finally took the plunge and attended a canning class. We had been skirting around the edges of canning for the past year or so. For one reason or another, we just never got around to it, but then Chrissie found a groupon for a canning class and signed us up. No more excuses. Really, it's one of the first things I should have picked up on because I love pickled everything so much. If you give me anything that's been brined or pickled, you win me over.

Canning pickled things is super easy. All you need are vinegar, salt, water, spices, and the food you want to pickle. You need some equipment, the bare essentials being jars, a stock pot, canning lids, and a device to remove the cans from the boiling water, like tongs.

From there, you grab a recipe and make your pickles. There is a great resource from the University of Georgia in conjunction with the Dept. of Agriculture (or maybe is the USDA) that has detailed information about every step of the process. Here's the link. The best part, it's all free. It's like, for the betterment of mankind or something. ;)

I think part of the reason I never picked up canning was because we never grew anything in a large enough quantity to justify it, and I couldn't bring myself to buy produce just to stick it in a jar. Going to the class helped turn me around though. When fruits and vegetables are out of season, the quality goes down and the price goes up. Buying produce in season and preserving them is a nice way to work around that. What's more, I found out that some local farm operations sell "canning boxes," which is produce that can't be sold on the shelf (because of bruising or whatever) but are perfect for going into a can. These canning boxes get sold a big discount. Not everyone does though, so do the rounds at your local farmer's market.

So, without further adieu, here are some pictures of our first canning adventure: pickled asparagus.

I cut off the woodier stalks and then halved the shoots to fit in a can.


Our stock pot. Note: water boils faster if the lid is on!

The asparagus was accompanied by 3 cloves of garlic and 1/4 of a jalapeno.
The finished product cooling down.
Here's the recipe:

1 pound of raw asparagus
4(ish) quart size jars
Vinegar - 5% acidity
"Seasoning" per jar
 - 1/2 teaspoon salt of pickling salt (kosher salt is an acceptable substitute, but double the amount)
 - 3 cloves of garlic
 - 1/4 of a jalapeno


Steps:
1. Wash the asparagus. The cut it and fill the jars with as many as will fit. Leave 1 inch of space at the top of the jar for air.
2. Add the seasoning.
3. Fill the jar halfway up with vinegar and the rest of the way with water. Remember to leave 1 inch of air at the top.
4. Put on your lid and tighten it moderately - not too loose or too tight.
5. Fill a stock pot with cool water and load it with jars. Bring it to a hard boil. Boil jars for 15 minutes. This time will differ depending on your altitude. Non-Sea-Level people, you know who you are.
6. Remove jars from pot and let them cool at room temperature for 12-18 hours. Let them cool on a surface that will not be affected by intense heat. Naked countertops not recommended!
7. Once everything is cooled, make sure you take off the rings and just leave the lid in place. This will prevent the rings and lids from rusting around the edges.
8. Let the cans sit for at least a week and then enjoy. Store them in a cool, dark place. These will keep for a long time. My rule of thumb is to use them within 1-2 years.

I hope this helps you all and happy canning!

Sunday, April 1, 2012

Neapolitan Cake


Aaron's birthday was a couple weeks ago, so I've been pretty busy making sure he was appropriately celebrated. Game days, baking, and shopping kept me on my toes and away from the blogosphere. Happily though, all our endeavors should lead to some fun posts to entertain the interwebs.

Like Aaron's Neapolitan birthday cake.

Aaron has a story he loves to reminisce about in which he and several of his friends would regularly stop by a little doughnut shop on their way home from youth orchestra rehearsals. They would eat doughnuts, drink milk, and be generally merry. Apparently, the shop sold three kinds of milk: regular, chocolate, and strawberry. So one night a few of them got it into their heads that Neapolitan milk was a positively brilliant idea and started taking swigs of all three kinds in succession.

He's adoreable, but that husband of mine can be pretty strange sometimes.

Nonetheless, remembering this story gave me the idea that the food for Aaron's birthday should have a Neapolitan theme. So, my first mission was to create the perfect Neapolitan cake. As per my usual, the idea in my head tends to be a little bit more advanced than my skills actually allow for. (Sadly, things always seem quite straightforward in my head too. Realism hasn't made it to my imagination yet.) I decided I would make a layer of vanilla cake, a layer of chocolate cake, and put a filling of strawberry mousse in the middle. Then I would frost it with vanilla frosting, cover it with chocolate ganache, and put some nice fresh strawberries on the top. No problem!

Everything was going swimmingly until I tried to put a nice thick layer of mousse in the middle. My mousse recipe hadn't stiffened up as much as I thought it would and when I placed the vanilla layer on top of it, a bunch came spilling out the sides. I thought I had it cleaned up enough to frost it, but during the process, more kept oozing out and the frosting became a messy, gooey hybrid with the mousse and just pooled up around the bottom of the cake. At this point I quite seriously considered throwing the whole thing out the window.

But instead I finished a thin layer of the strawberry mousse, scraped all of the gooey mess off and threw the whole thing in the freezer while I made a new batch of frosting. Had I been thinking on my feet, doing this in the first place could have avoided the giant mess I made, but c'est la vie.

This was before all the filling started falling out. Had it actually survived this way, the image in my head was potentially going to happen.


Once I had the cake constructed I'd run out of patience to make it particularly pretty, so I whipped up a batch of ganache and just dumped it over the top. On the day of Aaron's birthday, (I made the cake a few days in advance and froze it) I cut a couple of decent looking strawberries in half, placed them on top and called it a miracle.

At least it was a tasty miracle.

Excuse the color balance. I'm still getting used to my new camera.


The recipes I used are as follows:

Vanilla Cake
Chocolate Cake
Strawberry Mousse
Buttercream Frosting
Chocolate Ganache

Saturday, March 17, 2012

Happy St. Pattie's Day

Hello again. Big day for us today. First off, it's St. Patrick's Day. Second, it's the first home match for our MLS club, Sounders FC. Chrissie and I are season ticket holders and enthusiastic Sounders fans. If you'll forgive my brief aside, I would highly encourage everyone to go to a soccer game in person. Watching it on television really doesn't do it justice. Going to a game in person really is a lot of fun.

Anyway, in honor of St. Pattie's Day, we made an Irish Stew from a friend's blog. You can find the recipe here. Now, I've never had much luck with Crock Pots, but a lot of people swear by them, so I keep trying to find recipes that work for me. I did not successfully execute this recipe. Instead of cooking the stew on the low setting, I cooked it on the high setting (for the entire time). Now, I did this intentionally. I've cooked Crock Pot recipes in the past where I was told to cook something on the low setting only to come back to find that my dish did not cook at all. So, I've come to interpret "cook on low" to "cook on high." Not the case here. The author really means cook on low.

Not all was lost though. The dish was very forgiving and instead of a stew, we ended up with something more like a hash and it was still tasty. Here's a picture of the final results:


Not too bad looking either.

Chrissie and I are looking forward to entertaining you all with stories of our outside adventures soon. We just have to wait for the weather to let up. It's been precipitating in one form or another every day for the past two weeks, so as soon as things dry out, we'll be out there digging in the dirt again. Until next time!

Tuesday, January 31, 2012

Big Beef Day

Beef. It's what's for dinner.


Well, the day finally arrived - thanks to Erin from Simply Frugal Mom, we got our delivery of 1/8th of a cow. We've been really looking forward to this and are excited to taste some of it. We received a few roasts, a bunch of steaks, some miscellaneous cut up bits, and a bunch of ground beef. Overall, I'm very happy with the haul, although we may want to tweak some of the selection next time. We let the purveyor pick what we were to receive this first time and I think we can do with a bit less ground beef. Don't get me wrong, I love ground beef, but I've become accustomed to grinding it myself and will miss that for the next few months.

The beef hasn't completely overrun our freezer, which was a pleasant surprise. For the past week, I would have day dreams about not being able to fit everything in and being forced to eat beef for every meal for weeks just so none of it would spoil. In reality though, it was no problem, and we could probably stack 1/4th of a cow if we wanted to. It helps that we don't have a lot in the way of frozen food, otherwise the situation would be a lot different. The only other thing taking up a lot of space in our freezer is stock.

Speaking of which, I made a batch of beef stock on Sunday. OK, so I had to make a little room in the freezer for the beef, so all those old beef bits I've been hording went into the stock pot. My stock always looks "dirtier" than the stuff I get at the store. There are more bits floating around in it, even after its been strained and it never looks as dark or rich, but in taste, it absolutely trumps store bought stock. For those of you home cooks out there who haven't started making your own stock, I would highly encourage that you start. Elevating the quality of your basic ingredients will pay off big time on your plate.

Back to the beef, it came from Wapato, WA, which is about 170 miles away from our place. When we first started trying to be locavores, I had high expectations about how close to home we could get. My grand ideas comprised mostly of having a network of local farms that would be an easy drive away. I would be able to go on-site and procure everything I needed and get home before dark. I quickly found out that the world worked much differently than I imagined. There are a couple of reasons for this. First, the I-5 corridor is urban/suburban sprawl from Tacoma to Everett. That's about 60 miles north to south of uninterrupted concrete. Farms need space and within the "greater Seattle Metrosprawlitan area" that's getting harder and harder to come by. The second reason is because of property taxes. In the counties where you have those big cities and suburbs, property taxes are so high that would-be local farmers cannot make farming a viable way to earn money. If you head east from I-5, you can actually get to "country" after about 20 miles, but in those high property tax counties, namely King County (Seattle's county), you'll be hard pressed to find an actual full-time, working farm (if you do find one, you should probably go in and ask them if someone has to supplement that farm income with an outside source).

Some of my dreams were dashed when I found this out. Not only on the procurement front, but on the life front. I was hoping that one day, I could quit my day job, start a farm relatively close to "civilization" and have all the perks of rural and urban life. Alas though, the world does not work like that, which brings me back to Wapato. Wapato is great, it lives in the Yakima Valley, the breadbasket of Washington State, and just about the closest you can get to Seattle to start a farm. In the spirit of full-disclosure, I'm exaggerating, but only by a little bit. 170 miles. 3 hours away. Over a mountain pass. How "loca-" does that make us?

Regardless of the answer, it's just about the best that we have, and you can't really ask for more than that. Needless to say, I won't be taking an impromptu drive to find out what the name of my cow was before eating it. Maybe it would settle for being pen-pals.

Wednesday, December 28, 2011

Roast Beef Sandwiches

Happy Holidays, all! I hope everyone has been enjoying the season's festivities. Goodness knows we have. I think that this may finally be the year I fully come to understand the toxicology of sugar. The dose makes the poison! And I'm happy to admit that I'm ready to settle back into our more well rounded non-holiday diet. Starting with Roast Beef Sandwiches!

Aaron already mentioned that he loves making hearty stews and roasts during the Winter, but we're only two people and we don't consume a whole lot of meat in any one sitting so it's important for us to find a variety of ways to consume his creations. Recently, he made a pot roast. In our sugar-induced stupor yesterday, we decided to cut it up for some sandwiches.

We used our George Foreman grill to make them as paninis and in addition to the deglazed sauce Aaron made with the meat itself (he's amazing at deglazing things. Wonderful for the tastebuds, horrible for the waistline.) we added some of our homemade sharp cheddar (a post will come on that one day.) and some dijon mustard to Aaron's. The result was simple but incredibly tasty. So tasty that we made them again today:


I know my system was greatly appreciative of the protein and other nutrients that it's been largely lacking as of late. Though that didn't stave of the comfy-food coma.

What are your favorite things to do with holiday and roast type leftovers?

Monday, October 17, 2011

Tomato Sauce

Remember all of our green tomatoes? Remember how a few of them were actually red?

Actually, close to 4 pounds of them were red (or close enough). We took that chunk and decided to make some fresh tomato sauce that we could jar and save for some fun pasta dishes in the future. This time we used a recipe out of a James Beard cookbook that we picked up when Borders was going out of business. Such a sad, sad day. Borders was the only place I could consistently find Seattle's Best Coffee. Which happened to be the home of my absolute favorite cup of hot chocolate. I think they still exist in airports sometimes, but I'm not totally sure anymore.

But I digress. Tomato sauce. We'll post the recipe later, but the portion we used on pasta that weekend with our friend was absolutely delicious. So good in fact, that when we forgot to make salsa out of one of our other bowls of green tomatoes and they magically turned red, we made MORE sauce!


I wish I could say that we're set for the winter or something, but three jars just won't last very long. So, sorry fellow food-growers of the area. I'm not sharing this time. Unless you have something dang good to barter with. Be warned: I'm a picky girl.

Saturday, October 1, 2011

A Peck of Tomatoes (or so)

One of the joys of living in the Pacific Northwest - it's October and the long cold and wet season is beginning right on cue. Seriously.

So, it's a good thing I suppose that we decided to harvest our tomatoes, green or not, last weekend. We tried hanging on through part of October last year and just lost a lot of them to a wet rot. This year, we have the joy of figuring out what to do with this:

Don't let the red bowl fool you. Most of the tomatoes you can't see are still green.
That's not even all of them. We have approximately 10.5 pounds of mostly green tomatoes that we'll be experimenting with today. Our plan so far is as follows:

L to R: Chutney, Sauce, Salsa, Fried Green Tomatoes, Brine

With any luck, we'll find lots of great things to do with green tomatoes since it looks like our climate will give us lots of them for years to come.

Wish us luck!

Wednesday, August 31, 2011

Considerations

Things are pretty slow in the garden right now, so I thought we'd talk about some conversations Chrissie and I have been batting around lately.

For those of you that are curious though, here's a quick update on what's actually going on in the garden:
 - Potatoes are still going strong. We're waiting for the vines to wilt, which is the signal that they are close to ready to harvest. Instead, we have Audrey 2 (from a "Little Shop of Horrors").
 - Lettuce, also going strong. There's so much, we're giving it away. Anyone need any?
 - Tomatoes are starting to get red. Shut up. =)
 - Planted a wild strawberry plant out front. We hope that it grows prolifically.
 - Making plans to plant garlic and more grass seed come Autumn.

So, lots of waiting as you can see. Kitchen table conversation has been interesting though. A friend of ours recently went vegan, which jump started discussions about what that means beyond just food preference. Humans don't have to do all that many things every day. Man needs to eat, drink, defecate, and sleep. That's it. Crazy when you think about it, huh? But people don't get into arguments over whether they sleep on their side or their stomach. People don't start name calling when it comes to whether its better to drink Coke or Pepsi, and when it comes to the other thing, we don't talk about it in polite company. But boy, when it comes to food, we gang up like we're going to fight a turf war.

Normally, I don't like talking about the "why" when I talk to people about their food preferences. I figure that people have their reasons. That's cool. The perk is that it avoids a bunch of future land mines. That being said, I know that I'm walking into it now in this post. If I say something dumb, feel free to call me out.

I don't buy into the vegan thing. I like fruits, veggies, and non-meat things, but I don't feel like the arguments for it are compelling enough for me to change my eating habits. The only thing I do buy into is buying local. That's because it gives me the most ability to source where my food is coming from. What really matters to me is knowing that the person who grew/raised/made my food cared. It's funny, but if I know that one thing, a lot of others things can go unsaid and I can be pretty confident that food was done right.

Show me a diet that meets my criteria and I'll sign up for it too.

Monday, August 29, 2011

Pasta with Grilled Tomato and Sage Sauce


A couple of weeks ago I saw this recipe on Foodista. I was super excited and had planned to try it that same weekend. We even bought tomatoes. But time got away from us and we ended up using the tomatoes for something else. So, while we were on staycation last week and were wandering around Pike Place Market, we found a vendor from Yakima selling some decent looking fare and picked up some new tomatoes. We coupled those with sage from our garden, and an incredible blackberry infused balsamic vinegar from Leavenworth. The result was excellent.

Grilling the tomatoes adds a nice touch of slight smokey or charred flavor to an overall very simple dish. The blackberry vinegar we chose to use didn't seem to do much to the flavor (though I can't say for sure since we don't have a basis for comparison) but it did lend a nice aroma to the plate.

In the future, we may add more sage. We ended up having 2 pounds of tomatoes instead of the 1.5 that's called for and we adjusted the sage accordingly, but the flavor still seemed a little lost. I forgot to change the ratios of the oil and vinegar, but neither of those seemed lacking.

We also agreed that the sauce (while very good in its own right) could be interestingly enhanced by adding some sauteed garlic or onion, or by toying with other herbs. In it's basic state, it may also make a good pizza sauce. Hopefully we'll get enough nice days during the rest of the summer that we can test some of our theories out!

Monday, August 1, 2011

Roast Chicken

We made roast chicken for dinner on Sunday night. Making it isn't anything new, but I have never been totally satisfied with the results. It has been a while since I last made roast chicken. I made a point to do it tonight because I wanted to try some new things out. I've sort of been on a chicken quest lately. It's a search to find really yummy tasting chicken. I think I took a step in the right direction today.

The recipe is a combination of what I do with chicken normally and the Roast Chicken recipe from Julia Child's "Mastering the Art of French Cooking."

Ingredients:
3 lb. chicken
6 tablespoons of softened butter divided up equally into 3 parts
1 small carrot & 1 small onion - sliced
1 Tb good cooking oil
3/4 tsp salt
1/2 Tb green onion - minced
1 cup chicken stock
1 clove of garlic
1 sprig of rosemary

First off, picking a good chicken was very important. Ideally, you want a relatively young chicken (8 months old or less) who has lived a happy, fulfilling chicken life. This would lead me to getting my chicken from the farmer's market, but we didn't have time to do that today, so we got it from the PCC market. It was 3.75 pounds and claimed to be free range. After having eaten it, I could attest to it being superior to a normal supermarket chicken. I'm kind of done with supermarket chicken now. I've had life changing meals made from beef, pork, crab, fish, and a bunch of other things, but never with chicken. It's something that I've only noticed in the last couple of years, but chicken is really bland. There's something wrong with that.

Aside, if everyone eats bland chicken, can one actually say that it tastes like chicken? Maybe that's why everything tastes like chicken, it's the non-descript meat that can conform into any flavor profile. Maybe, it's the other way around. Maybe, chicken tastes like everything else.

Julia tells you to season the chicken before putting it in the oven by sticking 1/3 of the salt and 1/6 of the butter into the cavity of the chicken and another 1/6 of the butter smeared over the outside of the chicken. I did that and also added in a sprig of rosemary to the cavity and rubbing the clove of garlic (which I cut in half) over the entire outside. The garlic and rosemary I owe to Laila Storch and Marcel Tabuteau. you won't find Storch or Tabuteau in any food magazines or shows - they are/were professional musicians. You don't have to be a professional chef to have something meaningful to add. That's what I think anyway.

Julia also tells you to truss the chicken, but I didn't. In fact I've never done that, but I'm sure that I will one day as my quest for the perfect chicken will one day dictate.

Next, you put the chicken in your roasting pan surrounded by the carrots and onions and brown the left, right, and breast side of it under 425 degree heat. After the sides are browned (about 25 minutes total), the oven goes down to 350 degrees for the rest of the time (another hour).

While that's happening, mix 1/3 of the butter together with your cooking oil to make a basting solution and baste it onto the top of the bird every 10 minutes.

When the chicken is done cooking, it gets set aside to a warm platter to rest (makes the meat more juicy). While it's resting you make the sauce (the super yummy part). Spoon out all buy 2 Tsp of the chicken juice from the pan. I removed the burned vegetables from the pan. Add green onions and cook slowly for a minute, then add the chicken stock and reduce at hight heat until theres about 1/2 cup left of stuff. I mashed the leftover veggies as much as I could. Put sauce into a bowl and put the last 1/3 of the butter into it.

And then... eat!


I'm always pleasantly surprised by the sauces I make from the MtAoFC cookbook. Whenever I make them I am super skeptical all the way until the first bite. The process is full of second-guessing and overthinking. The last thought I have before Chrissie and I spoon some onto our plates is always, "God, I hope this turned out alright." Then, you put it in your mouth and bliss. If there's anything I can add to the cookbook, it would be a comment saying, "Don't skimp on the sauce, seriously!" If you say, make a meat dish and decide to skip the deglazing step at the end, you're missing out on a truly delightful experience.

Anyway, chicken! The quest continues.

Monday, July 25, 2011

Ricotta for our Ravioli

I got it in my head last week that I wanted to make ravioli from the ground up. If I could have grown and ground the wheat for the pasta, I probably would have. But that's not in the cards at this point, and I'm not nearly that patient anyway.

Most of the steps for this process were things we'd done before. We make fresh pasta regularly ('cause it's just so dang tasty!) and we've made our own tomato sauce before as well. So it came down to the filling. We were just aiming for a basic cheese ravioli, so there's not much to it, which meant we needed to make our own ricotta. This recipe from Serious Eats caught my attention right from the google search. Fresh ricotta in 5 minutes or less? Sign me up!

Conveniently, this cook advocates the use of a microwave to heat the milk to the desired temperature. When we made cheddar cheese a few months ago (post to come someday in the future) heating the milk felt a tad bit painstaking. But then, I may have been taking it a tad too seriously as well. Maybe.

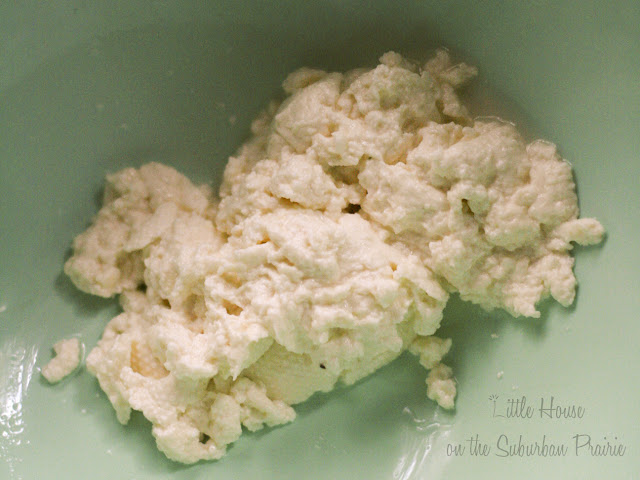
In process, we discovered that making 1/2 cup of ricotta in 5 minutes or less is probably possible, but making the 2 cups that we wanted for our recipe of ravioli wasn't going to be quite so streamlined. We made our ricotta in 2 batches (due to the size of our bowl and microwave) and still the milk took approximately 12-14 minutes to reach 165 degrees, even with our microwave set to high. Apparently twice the milk = triple the time. It's still a much more immediately gratifying process however than it's cheddar cheese cousin, which is aging for 6 months in our pantry (4 months down!). So, it took about half an hour in the end to reach our quota of 2 cups of fresh ricotta. But it was well worth it.

Fresh Cheese!
We make pasta often enough that we have the process pretty speedy at this point. Rolling out the dough only took about 20 minutes so while I did that, Aaron went ahead and mixed our fresh ricotta with the rest of the ingredients for our ravioli filling: parsley, parmesan, salt, pepper, and nutmeg.


For my taste, this recipe uses a little too much parsley. Next time, we may omit it all together and use oregano instead. But we're not entirely decided yet. And we had plenty of parsley growing in our garden, so for this round, it made perfect sense.

Once the pasta was rolled (note, it should be quite thin - almost translucent) and the filling mixed, it was time to construct our food:


Once they were complete, we boiled them for just a couple of minutes and topped them with our freshly made tomato sauce.

The finished product:


Verdict: the fresh ricotta really did make a difference. The raviolis were creamier and less rubbery than the ones we've made with ricotta from the store. The other pro is that we can make exactly as much as we need and not worry about needing to find additional uses for sub-par ricotta. I'm sure we'll do it again sometime.  You should, too!

Serious Eats Recipe for Ricotta

Cheese Ravioli
Originally from Mark Bittman

Ingredients
2 cups fresh ricotta
1/2 cup freshly grated parmesan
1 cup minced parsley
1/2 teaspoon nutmeg
Salt and Pepper to taste


Combine ingredients and fill freshly made pasta dough. Boil for 2-3 minutes until tender. Serve with your favorite sauce.

Monday, July 18, 2011

Our Perfect Pizza

There have been a few evenings over the last couple of months that I've gotten completely insatiable cravings for pizza, but we haven't had any of the typical ingredients, nor the desire to order a greasy heap of pepperoni from any of the 375289 chains in the area. No, I'm not actually a complete pizza snob... yet. Sometimes I still eat that giant pool of grease with reckless abandon and enjoy every second of it. But on the nights in question, I distinctly wanted something homemade.

Several years ago I went to this pizzaria in Wisconsin. I've also been to Japan. Somewhere in the amalgamation of those 2 places in my brain, I've grown pretty convinced that you can put anything on a pizza.

So, we rifled through our pantry and fridge and found the following:

olive oil
fresh rosemary
goat cheese
pancetta
pink lady apples

Pretty good for a kitchen devoid of tomato sauce. We also had enough staples to make a basic pizza dough, so we went for it.

I should stop here and admit that I have a bit of a crush on pancetta. Seriously. It's not quite as salty as proscuitto, but not as heavy as bacon. It has a big flavor for a small quantity. And it has a very high-class-culinary sounding name. Pancetta is all win, all the time.

But I digress. Here's the pizza pre-oven:


Just looking at it makes me want to make it all over again. Good thing I live in a state with lots of Apples.

Here's the finished product (which is a bit messier looking due to some user error involving the pizza peel):


And of course, the concise recipe since I know you're all going to want to make this yourselves tonight.

Seriously. Do it.

Apple - Pancetta Pizza

Ingredients

1 recipe of your favorite pizza crust
1 tbsp olive oil
1 tbsp fresh, chopped rosemary or to taste
1 cup goat cheese (feta also works well)
1/2 apple (pink lady is our preferred, but anything somewhat tart will do)
3-4 slices pancetta

Instructions:

Preheat your oven as high as it will go. Ours only gets to 525 degrees, which is pretty standard, but if you can get hotter, go for it. If you have a pizza stone, make sure that it's in the oven while it preheats.

Prep the pizza dough. Layer the ingredients beginning with the olive oil.

Once your oven is preheated, place the pizza directly on the pizza stone if you have one, or you may use a baking sheet.  Cook until the crust is just beginning to be golden brown and/or until the pancetta starts to brown at the edges.

Cut and serve!

Sunday, July 10, 2011

Bringing the Stadium Home

We haven't had a chance to do much shopping for groceries lately, but that didn't stop us today from creating a little piece of the stadium atmosphere at home while we watched the Seattle Sounders take on the Portland Timbers in soccer.  (GO SOUNDERS!)

I'm a sucker for giant soft pretzels and it had been a really long time since I'd attempted making any, so we decided to make that our stadium food of choice.  I found a nice looking recipe for Soft-Garlic Rosemary Prezels with White Cheddar Cheese Sauce from yumology on Tasty Kitchen to use as our foundation. In the end, we struck pretty true to it for the pretzels themselves and branched away primarily for the cheese sauce.

As it turns out, if you're on a timeline, I'd suggest having a pair of people working and to start the cheese sauce as soon as the first person starts rolling out the pretzels. It takes a fairly good while to get the rue bubbling and ready for the addition of the cheese.

Nonetheless, the results were excellent. The main modifications we made in the cheese sauce were to use medium yellow cheddar in place of the sharp white, 2% milk, and we omitted the cayenne. Most of these changes were simply made based on what was available to us. We chose to leave out the cayenne pepper because we wanted to stick with something pretty mild for today, since the game was destined to be spicy enough. ;)


Recipe - Garlic and Rosemary Soft Pretzels with Cheese Sauce
Adapted from yumology's adaptation from Cooking Light

Ingredients
  • FOR PRETZELS:
  • 2-¼ teaspoons Dry Yeast
  • 1-½ teaspoon Brown Sugar
  • 1 cup Warm Water
  • 3-¼ cups All Purpose Flour, divided use
  • 1 teaspoon Salt
  • 1 clove Garlic (large), Minced
  • 2 teaspoons Fresh Rosemary, Finely Chopped
  • ½ teaspoons Pepper
  • 6 cups Water
  • 1 teaspoon Baking Soda
  • 1 teaspoon Olive Oil
  • 1 whole Egg
  • Kosher Salt Or Sea Salt (for Topping)
  • Cooking Spray
_____
  • FOR CHEESE SAUCE:
  • 1 Tablespoon Butter
  • 1 Tablespoon Flour
  • 1 cup 2% Milk
  • ¾ teaspoons Salt
  • ½ teaspoons Pepper
  • 1 cup grated Medium Cheddar Cheese


Preparation Instructions 


1. Dissolve yeast and sugar in warm water in a large bowl, and let stand for 5 minutes.
2. Add 3 cups flour and 1 teaspoon salt to yeast mixture; stir until a soft dough forms. Mix in garlic, pepper and rosemary.
3. Turn dough out on to a lightly floured surface; knead until smooth and elastic (about 8 minutes). Add enough of remaining flour, 1 tablespoon at a time, to prevent dough from sticking to hands (dough will feel slightly sticky). Place dough in a large bowl coated with cooking spray, turning to coat top. Cover and let rise in a warm place (85°), free from drafts, 40 minutes or until doubled in size. (Gently press two fingers into dough. If indentation remains, the dough has risen enough.) Punch dough down; cover and let rest 5 minutes.
4. Preheat oven to 425°.
5. Divide dough into 8 equal portions. Working with one portion at a time (cover remaining dough to prevent drying), roll each part into an 18-inch-long rope with tapered ends. Cross one end of rope over the other to form a circle, leaving about 4 inches at end of each rope. Twist the rope at the base of the circle. Fold the ends over the circle and into a traditional pretzel shape, pinching gently to seal. Place pretzels on a board or baking sheet. Cover and let rise 10 minutes (pretzels will rise only slightly).
6. Combine 6 cups water and baking soda in a pot. Bring to a boil; reduce heat, and simmer. Gently lower 1 pretzel into simmering water mixture; cook 15 seconds. Turn pretzel with a slotted spatula; cook an additional 15 seconds. Transfer pretzel to a prepared baking sheet coated with cooking spray. Repeat procedure with remaining pretzels. Combine olive oil and egg in a small bowl, stirring with a fork until smooth. Brush a thin layer of egg mixture over pretzels; sprinkle with kosher or sea salt.
7. Bake at 425° for 17 minutes or until pretzels are deep golden brown. Transfer to a wire rack to cool.
—-
For White Cheddar Cheese Sauce
1. In a small sauce pot, heat the butter on medium-low. When melted, whisk in the flour until combined. Add the milk and stir constantly until mixture thickens and begins to bubble slightly. Next, mix in salt and pepper.
2. Add the cheese and stir/whisk on medium heat until melted into the sauce. Cook for about 1 minute or until sauce begins to simmer gently. Remove from heat and serve.

Wednesday, July 6, 2011

Eating Red, White, and Blue

As you may have guessed, Aaron and I decided to have a little fun with our food on Independence Day so we tried to make sure as much as possible that day that what we were eating was red, white, and/or blue. We wanted to stay away from the stereotypical strawberry/blueberry flag cake, so we had to get a little creative. There just aren't many blue foods out there!  Here's what we came up with:


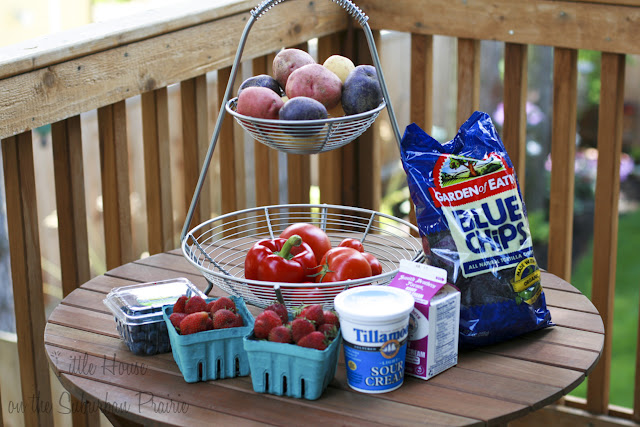
Blue chips, Red Salsa, Sour Cream

We didn't make much of this one, though I'm sure we could have. We made the salsa from scratch, but we weren't able to get to the farmer's market and while the tomatoes at PCC were decent, the season for them around here is really just beginning. The recipe for our mild red salsa:

2 heirloom or vine tomatoes (peeled, seeded, and diced)
2-3 small roma tomatoes (peeled, seeded, and diced)
3/4 of a red pepper (cored and diced)
7-8 stems of cilantro (chopped)
A dash of lemon juice
Salt and pepper to taste


Red, White, and Blue Rosemary Potatoes

I was originally intending to make these crispier but I boiled them a little too long and used more potatoes than my pan could handle. They turned out quite nicely anyway, so here's what we did:

Boil 3 potatoes of each variety (small varieties work best, we used Yukon Golds, Baby Reds, and Peruvian Purple) cut into approximately 1 - 1.5 inch cubes for about 10 minutes. Or until they're slightly less tender than they look above.

Heat 1/4 cup olive oil in a pan over medium-high heat when your potatoes are about 3 minutes away from being finished boiling.

When the potatoes are tender in the water, drain them. If the oil is sufficiently heated, add the potatoes to the oil.

If you're like me, your potatoes won't all be able to reach the heat source, so you'll need to periodically stir them around to ensure that all the potatoes get some chance at being cooked.  Don't stir them too much, or none of them will get crispy on the outside at all.

Once the potatoes look tasty, add about 2 teaspoons of fresh, chopped rosemary (1 teaspoon dried) and salt and pepper to taste. Cook for about 5 more minutes, then serve straight from the pan.


Grilled Strawberry Shortcake Kebabs

We found this recipe originally in Sunset Magazine, but made some adaptations for our taste. Sunset suggested using Angel Food cake, but neither of us prefer that so we made a fresh pound cake that morning. For the topping, Sunset also suggested using a combination of crème fraîche, whipped cream, brown sugar, and lemon zest, but we wanted something a little more simple, so we stuck with homemade whipped cream. All in all, we really enjoyed what we came up with, so here is our adaptation.

2 Slices of Pound Cake
8 Strawberries
2 Tablespoons Strawberry Jam
1/2 cup freshly made whipped cream


Heat the jam in the microwave just long enough so that it starts bubbling and coat your hulled strawberries with it. (We happened to have strawberry jam that was just made a week ago by my co-worker. I think this was a major plus.) Cut the pound cake slices into cubes. Double up the skewers for stability and thread approximately 4 strawberries and 3 pieces of pound cake onto each one. (As you can see, we had varying sizes of strawberry.) Place the skewers onto a relatively low-heat grill (approximately 350 degrees) for about 2 minutes per side. We tried to cook all four sides rather than just the 2 suggested by Sunset, but it might be different with Angel Food Cake. When the cake (and hopefully the strawberries) are lightly grilled on all sides, take them off and serve with the whipped cream!


We realize that our dessert did not have any blue. We had intended to make some blueberry fools to remedy that situation, but we were too full, too tired, and ready to watch some fireworks. So, the blue dessert will have to be saved for another day.

Monday, July 4, 2011

Happy Independence Day!


A few of our raw ingredients for the day. Do you sense a theme?

Wednesday, June 29, 2011

Food Tourist part 2

I'm a self-ascribed vegetarian tourist. I love taking periodic trips to Veggie land (I try not to stray off the road into Vegan land though), taking in some of the sights, and then coming home to my normal life. In fact, I'm a regular. I probably do it a few times a month. The trips are pretty short though - only for a day or two. That's enough for me though. I'm happy just visiting. I don't want to live there, but I wouldn't mind if they knew me on a first-name basis. I call it "tourism" because to me, it's just that. You're there to see the sights, take a break from your normal life, and then head home when you're all done. It's just more symbolic than literal.

Good things can happen as a result too if you let them. Whenever I travel, I find that I see myself from a different perspective during and after the trip. This in turn usually gives me a moment of self-realization, which can be followed by self-improvement (if I feel like it). I also find that my horizon expands, which leads to incorporating new things back in my "normal life."

The same thing can happen with trying out a new food lifestyle. I think that the biggest change I've experienced so far is that I notice a lot more foods. It's definitely been a gradual process. Each new "trip" has added a new level of awareness. In the beginning, after I started cooking seriously for myself, I started to notice the parts of the grocery store that were not processed foods. Then, I began to see the difference in quality of food. Vegetarianism opened up my awareness to more vegetables (duh). French cooking exposed me a huge amount of things one can do with butter, cream, and eggs. The Raw Food trend made me aware of edible wild plants (aka weeds). The list goes on and on.

Our one Raw Food "trip" so far was pretty miserable, though Chrissie and I can laugh about it now. We went on a 5 day smoothie/raw food cleanse. You actually have a lot of options for raw food, but we ended up going smoothies because we thought it had the highest probability of success. We piled up a bunch of fruit, veggies, and juice on Sunday and planned to go Monday through Friday on the diet. I didn't even last a day. I couldn't handle having nothing but smoothies. Tuesday, I started going out for lunch, but I still did smoothies for breakfast and dinner with Chrissie. That definitely stung me with shame and self-loathing. I felt like one of those tourists that goes to a foreign country and eats at McDonald's.

Chrissie was a trooper and finished the diet, although she was miserable the entire time. After a while, she didn't even bother having dinner. I think that happened in a couple days. She just couldn't consume that much smoothie. So, in the end, her tact was the opposite of mine. Instead of being a cheater tourist, she was a starving tourist. I think she lost 5 pounds in the end.

From the experience, I learned that taking smoothies is a great way to get your fruits and veggies. The ingredients aren't cooked so they retain all of their nutritional value and it doesn't take a lot to hit your daily allotment of fruits and vegetables. It's my plan to make these for breakfast one day... once we're totally over the shock of the smoothie cleanse experience. Until then, we'll keep things the way things are - vegetables cooked and fruit whole.

Sunday, June 26, 2011

Food Tourist part 1

I love being a food tourist. I love getting out there and sampling different foods from different places, and just as important, how people prepare that food. Increasingly, how and what we eat is becoming a statement of our lifestyle. So, I don't necessarily have to go far to try somethinng new, I can just go next door and find out what's for dinner, or pick up a cook/diet book and make it for myself.

If you've ever seen an episode of "No Reservations" hosted by Anthony Bourdain, then you know how I like to roll. I want to eat the same stuff that the locals eat, at the same places - I want to feel connected to that place. To me, travelling is all about dropping how you live at home and adopting how people live wherever you are.

The best trips I've taken so far have been to foreign countries or places where we know people. Our honeymoon to Fiji was a blast. I'll be honest, it's a bit touristy. I will forgive them for it because that's how they generate a lot of their income.

Life in Fiji takes a more relaxed pace. Time becomes more of a suggestion than a rule and idleness is encouraged and accepted. If you were to walk up a Fijian and say, "I'm bored, is there a bowling alley I can go to?" I think they'd just laugh at you.

The best part about the food in Fiji was the fresh fruit. It was the first time I've ever had honest-to-goodness truly ripe tropical fruit. Ever eat an orange with no sourness in the flavor? Just sugar and orange? I have, and I'll never be the same because of it. All of the fruit tasted pure.

Contrast that to time I visited Hawaii. Hawaii is known for its pineapples, but try and get one over there. Just try it. You can't, because they're all sent to the mainland. Every single one of them. I can get an apple in Washington, a peach in Georgia, an orange in Florida, but I can't get a pineapple in Hawaii. WTF? It's stuff like this that really make we wonder about the way things work sometimes.

In defense of Hawaii, I am told that residents there do have access to the fresh tropical fruit that I crave - it's just not sold in markets. People grow them in their back yards and it's more of a cottage industry type thing. Which means that if I want access to the good stuff, I have to become really good friends with some resident Hawaiians. If any Hawaiians are reading this, please be my friend! I enjoy cooking & eating good food, music, reading history books, and playing strategy games. I like dogs. Please have a back yard.

Wednesday, June 22, 2011

A Strawberry Weekend Pt. 2

A flat of strawberries is a lot. Especially when they're so ripe that you have to down them as fast as possible to avoid losing your investment to your compost bin (which isn't a total loss I guess. But it's still sad). We'd already planned on making some fresh lemonade so in light of our impulsive strawberry buy, we decided to make it strawberry lemonade! It's the superior drink in my book anyway.

The thing is, when you have a lot going on in your kitchen and two people who both think they know what they're doing, the plan can go slightly awry. First, poor Aaron got three lemons (3/8 of our double batch recipe) nicely squeezed and then inadvertently bumped the vessel that he was juicing into and dumped it all over the dog lying beneath him. We conceded to make a single batch and went back to our individual tasks at hand. Aaron got to work on the strawberries for the lemonade while I worked on one of our other weekend concoctions (oatmeal chocolate-chip cookies, I believe. It all starts to run together) and I wasn't paying attention. A little while later I looked up to see Aaron dumping the strawberries into his freshly squeezed juice proudly. Straight off the cutting board. Tart as can be.

Soo, our lemonade was not quite as sweet as I prefer. It wasn't horribly tart (thanks to the fact that the recipe calls for sugar syrup to begin with and Aaron adding a couple spoonfuls of sugar after realizing what had happened). I'm sure not everyone in the world even bothers to sugar the strawberries before adding them to the lemonade. But not everyone in the world eats chocolate either. Or so I hear. (Who are those crazies anyway?) It was still quite good and even better - the dog smelled lemony fresh!

But what about you? How do you prefer your lemonade?

Tuesday, June 21, 2011

Celebration!

It's the summer solstice and lots of people are celebrating. Around here, a glimpse of the sun lately is enough to sound the alarm, but to have it appear all day for the first day of summer is nearly worthy of fireworks. And lots of naked bicyclists.

We have our own reasons to celebrate here at our little house on the suburban prairie. Over the weekend, we hit our first blog-related goal: to reach 25 followers in our facebook group! This means now our facebook page is now allowed to have a unique handle instead of a random clustering of letters and numbers. For those who care, you can now find our facebook site at https://www.facebook.com/oursuburbanprairie.

Achieving our mini-goal was so super exciting to us that we've decided to host a giveaway. In honor of the humble beginnings of our trek, we're giving away 1 copy of the book that started it all for us: How to Cook Everything.


While the book doesn't *actually* contain recipes for absolutely everything that we've wanted to cook, it's been a great foundation for our adventure into food. Our copy was a wedding gift from my grandma, and grandmas can't ever be wrong about cooking, right?

For the giveaway, there are three ways to enter:

1) Leave a comment on this post
2) Follow our blog
3) Like our facebook page

You may enter in all three ways or any combination thereof, but only one comment on the post will be counted. If you're already following us either here or on facebook, you'll automatically be given those entries.

The contest is open until Wednesday, June 29th at 8:00 p.m. Pacific Time. We'll announce the winner on our first Month-iversary of blogging, June 30th.

Thanks for reading and good luck!